
Here is the Wrap Skirt Pattern PDF #1 for your back panels and the Wrap Skirt Pattern PDF #2 for your front panels. Print all the pages in the PDF and tape them together as shown above and then cut it out. Each page is numbered, pattern #1 has 9 pages and pattern #2 has 6 pages. You'll need both.
As I mentioned above, this wrap skirt pattern "as is" is for a person who wears a size smallpre-pregnancy. If you need a larger size, simply add inches to the middle panel which is just a rectangle. You'll also want to add inches to the waist tie. When in doubt, take your pattern pieces and wrap it around yourself to check the fit first, before cutting.
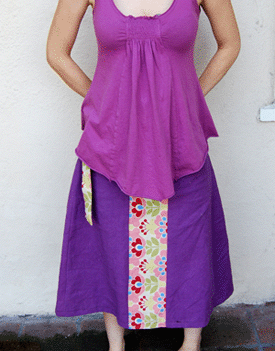
For pattern piece #1 you'll need to cut two, but flip one so they are mirror images of each other so that you have two opposite pieces in the right side of your fabric. These will be your back panels.
For pattern piece #2 you'll also need to cut two and also flip one so they are mirror images of each other. See all the pieces cut out below if you are confused. These will be your front pieces, on either side of the center contrast/print fabric.
You'll also need to cut out:
- One 5" x 26.5" rectanglular piece of fabric for your middle panel (the printed fabric below). Pick a coordinating fabric of a similar weight as your main fabric. If you are creating a larger size, this is the easiest place to add your extra inches, just cut a wider rectangle.
- One 3.5" x 86" strip of fabric for your waist tie belt. (Or, you can cut two 3.5" x 43" pieces like I did and combine them) Again, you'll need to add inches in length for larger sizes.

tart by sewing the panels together and then finishing the edges and bottom hem. Simply fold over and sew to finish the outer edges


Sew your waist tie inside out and then turn it. This is the longest part of the project, it takes some patience to turn it right side out, use a chop stick to help you turn it right side out.
Next, iron the entire waist tie, with the seam down the middle of the back side. Finally, pin it onto your skirt, so that when you wear the skirt, the seam is positioned against your body and sew.
Next, iron the entire waist tie, with the seam down the middle of the back side. Finally, pin it onto your skirt, so that when you wear the skirt, the seam is positioned against your body and sew.

The final step is to create a tiny hole for your waist tie to pass through in the waist band on one side, so it is truly a wrap skirt.
Now wrap the skirt around your waist to see where your tie should pass through the waistband. For mine, I snipped a hole about 10" from the edge of the left side. The side you put it on is also up to you. Make sure you snip the hole just big enough for the tie to pass through.
Now wrap the skirt around your waist to see where your tie should pass through the waistband. For mine, I snipped a hole about 10" from the edge of the left side. The side you put it on is also up to you. Make sure you snip the hole just big enough for the tie to pass through.

Finish the hole by hand stitching all the way around it...or if your sewing machine can do button holes you could do that with the machine. I generally hand-stitch with a thicker embroidery floss in a matching color and it holds up well
Hiç yorum yok:
Yorum Gönder