
It’s nearly impossible to find free sewing patterns on the ‘Net, so here are the patterns and how-to instructions for two styles of unisex casual pants I made yesterday. Now you can make your own.
Thai Fisherman’s Pants
These are one-size fits-all pants that wrap around and tie with a sash. Very comfy and stylish, too. You can use almost any weight fabric—from silk to lightweight denim. The Thai ones are cotton or rayon. Make sure your fabric looks nice on both sides; I did mine with a contrasting top panel because the print I used for the legs looked ugly on the reverse.
These are one-size fits-all pants that wrap around and tie with a sash. Very comfy and stylish, too. You can use almost any weight fabric—from silk to lightweight denim. The Thai ones are cotton or rayon. Make sure your fabric looks nice on both sides; I did mine with a contrasting top panel because the print I used for the legs looked ugly on the reverse.
You’ll need
2 meters fabric
matching thread
About an hour.
2 meters fabric
matching thread
About an hour.
Cutting:
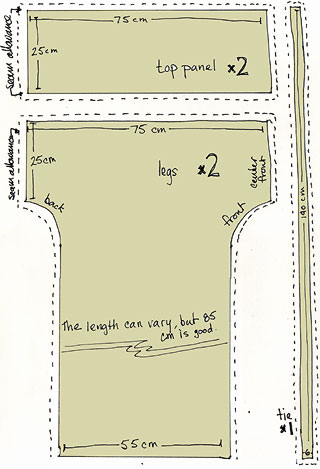
top panel (2): 25 cm x 75 cm
legs (2): 75 cm x 85 cm, with a curved 50 x 10 strip cut away on each side
tie (1): 6 cm x 140 cm
legs (2): 75 cm x 85 cm, with a curved 50 x 10 strip cut away on each side
tie (1): 6 cm x 140 cm
I measured and cut directly on the fabric without a paper pattern. Don’t forget to add extra for the seams. I usually do 1 cm all around.
If you’re using fabric with a directional pattern, cut the cloth in half widthwise and turn the fabric so that the pattern runs the same direction on both legs.
Construction:
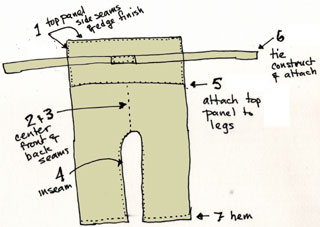
- Sew the short ends of the top panel to form a large hoop. Hem one edge of the hoop.
- Sew the center front seam.
- Sew the center back seam.
- Starting at the center and working out, sew the inseam.
- Attach the top panel to the legs.
- Construct the sash and attach to the top panel at the back.
- Hem the legs.
Points:
French seam the top panel sides so there are no raw edges.
Finish the top panel edge with a tiny hem.
Attached the belt securely to the center back of the top panel.
French seam the top panel sides so there are no raw edges.
Finish the top panel edge with a tiny hem.
Attached the belt securely to the center back of the top panel.
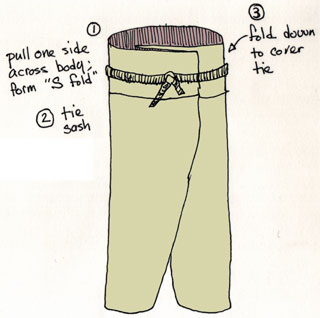
To wear them, slip them on and hold the edges out from you (like a diet “after” picture). Pull one side tight against your body and bring the rest of the fabric across yourself to form an S curve. Bring the ties around your waist and knot. Fold the top down over the ties.
Comfy Pants
These baggy pajama pants are derived from the mompe slacks in John Marshall’s “Make your Own Japanese Clothes.” An elastic waist makes them really easy to wear. You can increase the width of the leg opening to get a more skirt-like palazzo pant.
These baggy pajama pants are derived from the mompe slacks in John Marshall’s “Make your Own Japanese Clothes.” An elastic waist makes them really easy to wear. You can increase the width of the leg opening to get a more skirt-like palazzo pant.
This pattern needs to be drafted onto paper, but it’s not difficult to do at all. Once you’ve done it, you can use it over and over, or until you size changes.
You’ll need
2.2 meters fabric, depending on your leg length
elastic for the waistband (your waist + 5 cm)
matching thread
a ruler
a calculator
a crayon or colored marker
a sheet or two of newspaper
tape
About 90 minutes.
2.2 meters fabric, depending on your leg length
elastic for the waistband (your waist + 5 cm)
matching thread
a ruler
a calculator
a crayon or colored marker
a sheet or two of newspaper
tape
About 90 minutes.
Drafting:
Measure yourself (it’s much easier if you have help with these!)
Measure yourself (it’s much easier if you have help with these!)
 Hips ________ cm
Waist to floor ________ cm
Crotch to floor________ cm
Around ankle and heel ________ cm
Now lay out your newspaper so that it matches the waist to floor measurement. Tape together if necessary.
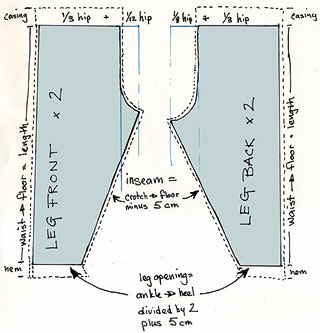
Front Leg:
- From one corner of the paper, measure 1/3 your hip measurement and mark it.
- Move over 1/12 of your hip measurement and mark that.
- At the 1/3 + 1/12 point, draw a line all the way down the paper.
- At the bottom, mark the width of the leg opening. (1/2 the ankle-heel + 5 cm)
- Calculate the inseam: crotch to floor minus 5 cm.
- Using a tape measure stretch to the inseam length, make a diagonal from the end of the leg opening to the 1/3 + 1/12 line.
- Draw a gentle J-shaped curve from the end of the inseam to the 1/3 mark.
Back Leg:
Same as the front leg, but use 1/3 plus 1/8 of your hip measurement. This allows a little extra room for your derriere.
Same as the front leg, but use 1/3 plus 1/8 of your hip measurement. This allows a little extra room for your derriere.
Cutting:
Follow the pattern, adding seam allowance all around, plus about 8 cm at the top for the elastic casing and 5 cm (or more) at the bottom for a hem.
Follow the pattern, adding seam allowance all around, plus about 8 cm at the top for the elastic casing and 5 cm (or more) at the bottom for a hem.
Construction:
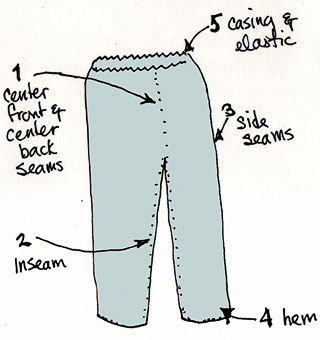
- Sew the center front seam and center back seam.
- Starting at the center and working down the leg, sew the inseam.
- Sew the side seams.
- Hem the legs.
- Construct the casing and thread the elastic through.
Çözebilirseniz Kolay Gelsin. Ben başka açıklayıcı site var mı ona bakiiim :)))
Hiç yorum yok:
Yorum Gönder